
FL studio Patcher is an instrument and/or effect chainer which you can use to build complex effect and instrument chain units.You can use it either as a instrument which allows you to chain together instruments AND effects or in a Mixer Track’s fx slot as a effect chainer only. What’s really cool is that it allows you to use UNLIMITED amount of instruments and effects to build these chains and you can connect them all together in several ways making it possible to create some really advanced chain units. Also, you can save the patches and re-use them in your later projects.
In this tutorial I will show you some of the basics of Patcher and how you can use it to build those instrument and effect chains.
So let’s begin!
First, let’s use the Patcher as a instrument so we can use it to chain together couple of instruments inside it. Start by loading the Patcher by going to Channels -> Add one -> and choose Patcher.

First thing you see is the Map -view. This is the workspace where you build the chains. There’s ‘From FL Studio’ (this represents the note/MIDI output coming from FL Studio which as the note data sent by your MIDI keyboard or Piano Roll) and ‘To FL Studio’ (this is the Audio Output where you need to connect at least one of the instruments in the chain to be able to hear a sound). Between these two you add objects (generators, effects or controls) and connect them to each other.

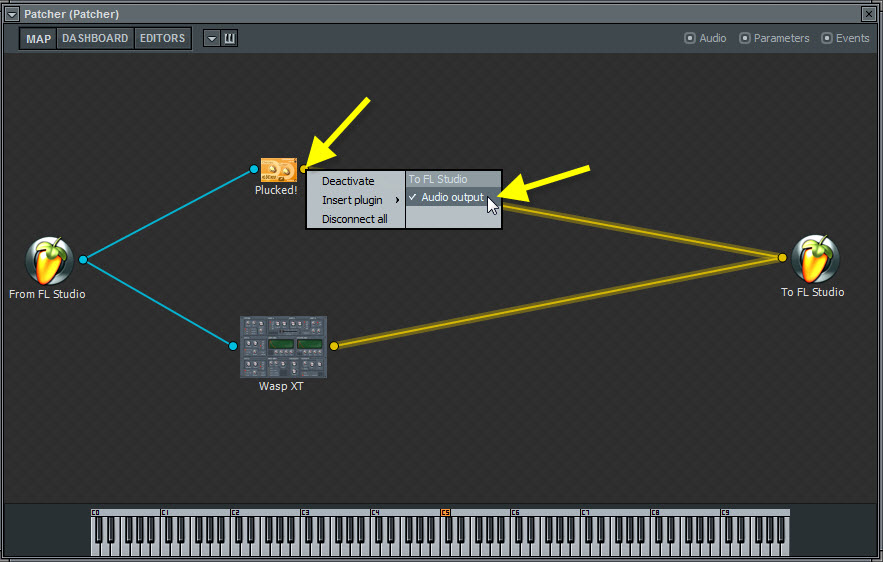
First we need to add a generator (instrument) so right click on somewehere on the Map workspace and choose Add plugin -> and your favourite synth from the menu. I will be using Plucked in this example.

The instrument will be added to the Map and it connects automatically to the note/MIDI Output (From FL Studio, blue line) and to Audio Output (To FL Studio, yellow thick line). You can now use your MIDI keyboard, Piano Roll or computer keyboard (if enabled) to play the Plucked just like you normally would do.

You can control the instrument output volume level by left clicking & dragging the yellow thick line that connects the Main Output of the instrument to Audio Output. Right click the yellow line to completely mute the output.


If you double click the instrument object or click on the ‘Editors’ -tab, it will show the plugin interface and you can tweak it and select presets just like you would normally do.

Ok, head back to the Map -view and drop another instrument on the workspace. I’ll use Wasp XT.
When you add the instrument to the Map view, it will automatically connect to the note/MIDI output (‘From FL Studio’), but in order to hear the sound it needs to be connected to the Audio Output and that is done by left click & dragging a line from the Main Output of the instrument (brown dot) to the Audio Output (‘To FL Studio’) (yellow dot).

Now both instruments can be played at once. The concept is pretty much the same as with Fruity Layer. And remember that you can add in and chain unlimited amount of instruments.
Oh, and if you’re wondering the best way to disconnect instruments or effects from each other, right click on that dot that is after the object and from the menu (under the Deactivate) choose the connection you wan’t to deactivate.
Alright, let’s add some effects. Again, right click somewhere on the Map -workspace and choose Add Plugin. I’ll use Fruity Delay 2. You have now several options how to connect the instrument to this effect:
You can connect only one of the instrument to the Main Input of Fruity Delay 2 and from there to Audio Output (this way the effect will act like a normal insert effect to the instrument: the whole instrument signal will be processed) and let the other instrument bypass it by letting it connect straight to Audio Output.

Or you can connect both instruments to the Fruity Delay 2 and from there to Audio Output. This way both instrument audio signals will be processed.

OR, connect both instruments straight to audio output, but ‘split’ one of the instrument audio signals (or both if you want) and connect it through the Fruity Delay 2 to the Audio Output. This is like using send effect: the unprocessed (dry) signal of the instrument will be sent to the Audio Output ALONGSIDE with the processed (wet) signal and you can control the levels of both signals independently.

This gives a whole lot of possibilities as you can process the wet signal even more by adding more effects before or after it. For example, you can add distortion just to the delay signal by dropping Fruity Fast Dist after it. Or phaser. Or Flanger. Or all of them. Then pan this whole processed signal chain to wherever you want by adding Pan-O-Matic to the end of the chain. Or you can do that to just one of the processed signals by splitting even further. And so on. Unlimited possibilities really.
But what if you want to AUTOMATE the instrument/effect parameters that are inside the Patcher chain?
No problem. In the Map -view, right click on the instrument or effect object and from the menu, select Inputs -> Parameters -> and the parameter you want to automate.

Red dot appears in front of the instrument/effect object. Right click somewhere on the Map -view area and choose Add Control -> Knob from the menu. Control 1 -object will be added to the Map. This is a control knob which you can connect to instruments & effects to control the selected parameter (you can have unlimited amount of these as well).

Now, connect the Control 1 to the instrument parameter by dragging a line from the red dot of the Control 1 object to the red dot of the instrument/effect object. The parameter is now linked to the Control 1.

Double click on the Control 1 object and you will be taken to a Dashboard. There you can see the Control 1 -knob. Now you can tweak it, rename it, and use right-click to choose ‘Create automation clip’ and proceed to edit the automation envelope in the Playlist View.

That’s be basic idea of the Patcher.
Okay. You can also use the Patcher in Mixer Track fx slot as a effect chainer. This is a way to use unlimited amount of effects in one effect slot and create some totally cool sounding signal processing chains.
Let’s create an example chain. In the following example I’m going to show you how you can use Patcher to process only a certain frequency area leaving the other frequencies intact.
Begin by starting a new project. Load your favourite plugin (or sample/loop). I’m using SimSynth. Assign it to a free mixer track and drop a Patcher to it’s fx slot.

Now basically the usage is the same as if you were using the Patcher as an instrument. Only difference is that you can’t add generators (instruments) to the chain – only effects – and the incoming signal to the Patcher is audio signal and not note/MIDI data.
Ok. Drop two instances of Fruity Parametric EQ 2’s (PEQ2) to the Map -view and Connect them to Audio Output (To FL Studio).

Double click the first PEQ2 to open it’s interface and load a preset ’40Hz Cut’. This is a high pass filter which’ll cut everything below 40Hz. Set the frequency to 2kHz. This’ll pass through everything above 2kHz.

Scroll down to the second PEQ2 interface, load a same preset (’40Hz cut’) and change the filter type to low pass filter and set the frequency to 2kHz. This’ll pass through everything below 2kHz.

What we have here now is the incoming audio signal splitted and going to Audio Output through two PEQ2’s. The first PEQ2 passes only the frequencies ABOVE 2kHz and the second PEQ2 passes the frequencies BELOW 2kHz and this allows us to process either of these frequency areas independently. For example, we can add distortion that applies only to frequencies above the 2kHz, but doesn’t affect to the area that is below 2kHz. Or vice versa. Cool eh?
Let’s try it out.
Drop a Fruity Fast Dist to the Map -view and disconnect the first PEQ2 Main Output from the Audio Output and connect it to the Main Input of Fast Dist and then connect the Fast Dist Main Output to the Audio Output.

Now, open the interface of the Fast Dist and tweak it like this (for example) and check the audio example:

As you can hear the higher frequencies (above 2kHz) are now distorted, but not the ones below that.
Ok. I’ll show you one more example: I’m going to turn a dry bell lead sound to a etheric pad. Here’s the sound example:
Here’s how I do it.
After starting a new project, I load a Wasp XT and choose a preset ‘Bell Lead’ and assign the Wasp XT to a free Mixer Track.
I’ll drop a Patcher to it’s fx slot and in the Map workspace, I’ll add these effects: Fruity Reeverb 2, Fruity Love Philter and Fruity Phaser and connect them as follows:
- Audio Output (From FL Studio) to Fruity Reeverb 2 Main Input.
- Fruity Reeverb 2 Main Output to Fruity Love Philter’s Main Input and to Fruity Phaser Main Input.
- Love Philters and Fruity Phasers Main Outputs to Audio Output (To FL Studio).

Next, I’ll open the Fruity Reeverb 2 interface and leave the other settings to their defaults, but set the Decay to 12.0 seconds, Dry level to 0 and Wet level to 100% (basically, the reverb effect with a long decay time and Dry level set to 0 so that only the reverbed signal gets passed along is the key here. That’s what makes the original sound go pad’ish and etheric).

Next, I’ll open the Fruity Phasers interface and choose a preset ‘MoogIt 2’. The Phaser (and this particular preset) is here to ‘sweeten’ the reverb-rich signal so that it doesn’t sound so cold and metallic.

I’ll head back to the Map -view and set the Main Output -> Audio Output volume level of the Fruity Phaser to near 40% (by left clicking & dragging that yellow line) just so that it doesn’t take over the signal too much.

Now, I’ll open the Love Philter’s interface and choose the ‘Default’ preset. I’ll go to the first Filter Unit and set the Filter Type to ‘Vanilla Low Pass’, Filter Cutoff Frequency to 10% and draw a following Cutoff envelope pattern and loop it (Love Philter is here for the filter modulation – to give more life to the sound):

Ok. Lastly, I’ll set the Love Philters Main Output -> Audio Output volume level to around 30% (again dragging that yellow line).

Done!
Basically you can create all these example-chains via ‘traditional’ ways as well (using mixer & insert/send effects), but doing it via Patcher is a lot faster and easier as the connections can be handled visually/logically and without too much hassle.
I hope this tutorial helped you to understand how the Patcher works. Watch out this blog for some cool Patcher presets pretty soon!
Check the video below:
Download Patcher Project 1 (EQ Processing):
Download Patcher Project 2 (Etheric Pad):


12 Comments
Another great one Petri 🙂
Never knew how to properly use this!
Thanks Jon! Patcher is really cool yeah. Btw, if you have access to Image-Line forums, check this thread for some really cool user made patches!
Awesome! I was the guy on Facebook who asked about this! 😀 Thanks!
No problemo, hope you’ll find it useful! 🙂
Hi Petri, I guess patcher only works for FL studio right? are there any other methods or plugins that can simulate this using other DAW’s?
Worth asking I guess…thanks
Hey there,
Yeah, Patcher is in FL Studio only and I’m not sure if there is any equivalent plugins for other DAWs.. sorry mate.
Plogue Bidule
Thanks!!! You are the best!!
Absolutely brilliant! I can’t wait to get into this tutorial. Limitless possibilities. This site ROCKS!!
Thank you very much!
Thanks for the tuts. How can we do MS EQing with patcher
Great tutorial. Also saw it on Youtube. I am wondering if I can use and if so how to route midi from one track to another. So let’s say I have a track that has VST1 with four notes (instrument doesn’t matter) – c,e,f,g – that I created. I loop the four notes 16 times. What I want is to see 64 notes in the output track that has VST2 loaded. I have seen some notes on how to do this with patcher/Midi Out but nothing has been very clear. What I would like is a high level step-by-step.
Load Patcher
Drag in VST1 to patcher
Drag in VST2 to patcher
Connect VST1 to VST2
Hopefully I have made myself clear.
I appreciate in advance any time you put into this. I have no issue with paying for a remote session on my system for such a tutorial if you are ok with one-on-one tutorials.