
In this tutorial I will show you how to create a psytrance (psychedelic trance) style driving, hypnotic beat & bassline in FL Studio. Here’s an audio example what I’m talking about:
First, set the project tempo to 145bpm.
Next, you need to build nice and steady 4-to-the-floor beat sequence so drop a kickdrum, closed hihat, open hihat and claps samples to the sampler channels, rename the channels (just to keep things organized) and assign each channel to a free Mixer Tracks.
Now, using the Step Sequencer, create a following beat sequence:
Add kickdrum notes to steps 1, 5, 9 and 13.

Add claps notes to steps 5 and 13.

Add closed hihat notes to every step to give that ‘rushing’ feel to the beat. Use Step Sequencers Graph editor to edit the Velocity events of the closed hihat in a following way: In the first step, drop the velocity to around 53%, second step to 38%, third step to 78% (default), fourth step to 38% and repeat this to the rest of the three bars. This will add a nice variation to the otherwise machine gun -like hihat pattern.

Add open hihat notes to steps 2,3 & 6,7 & 10,11 & 14,15. Again, open the Graph Editor and edit the Velocity event: step 2 to 50%, step 3 to 78% and repeat it to steps 6,7, 10,11,14,15.


There, the basic beat sequence is done. Now we need to set the levels between the drum sounds in balance, add some effects and eq a bit so open the Mixer. We are going to mix the drums so that the most power is given to the kickdrum – I’ve found this to be quite a working rule of thumb on mixing electronic music. To make this happen with these specific drum sounds, start with the kickdrum and following settings:
Set the kickdrum volume level to 0.0dB and use the Mixer Track eq to boost the low end (low shelf filter, frequency of 270Hz, bandwidth of 0.27 and 8.8dB boost).

Set the claps volume level to -2.5dB (89%). Also add a Fruity Parametric EQ 2 and use low shelf filter to cut the low end off (frequency of 247Hz, bandwidth of 60% and -18.0dB cut) and boost the high end via high shelf filter (frequency of 7537Hz, bandwidth of 60% and 2.8dB boost). I also added Fruity Reeverb 2 to add a slight sense of space to the clap (check the specific settings from the pic below):

Set the closed hihat volume level to -1.5dB (94%). Pan it to 20% left.

Set the open hihat volume level to -6.7dB (72%). Add Fruity Phaser (phaser effect is here to make the open hihat sequence sound a tad more interesting) as a SEND effect for the open hihat. You do this by dropping the Fruity Phaser to the Send Track 1 fx slot. Using send effect gives a better control over the mix level between the dry (non-effected) and wet (effected) signal and this is what I need as I just want to add a slight phasing effect ‘on top’ of the open hihat, but leave the original signal intact ‘on bottom’ (send effect is also typically used if you wan’t to use a same ‘time-based’ effects such as reverb or delay with same settings on several different Mixer Tracks as it will save some CPU because you dont have to load a new instance of these same effects on every single Mixer Track).
Ok, let’s move on with the phasing: choose the preset ‘wishwash’ and set the Sweep freq. to 0.167968. Now, when you’re in the open hihat Mixer Track, tweak the Send Track 1 Send Volume -knob to 52% (with Send Volume knob you can control how much of the source track signal will be sent to the Send Track and this affects how much of the effect in the Send Track fx slot will be applied to the source track signal. Also, you can control the effect signal level by using the Send Track volume level slider. This will control how much of the Send Track signal will be sent to the Master Track).

Okay, the drums are pretty much set. This is how they sound:
Next we’ll program the the bass sound using TS404 so load the TS404 Bassline Synthesizer and assign it to a free Mixer Track. For creating a nice ‘rubber bass’ -type of bass sound, tweak the TS404 as follows:

Now, open the Mixer, go to the Mixer Track that is assigned to a TS404, set it’s volume level to -7.0 dB (71%) and drop a Soundgoodizer to the it’s fx slot (to give more ‘beef’ to it) and set it like shown in the pic below (also, boost the low end to give even more beef to it by using the Mixer Track eq and using the low shelf filter, set the frequency to 235Hz, leave bandwidth to 0.27 and boost 10.8dB):

Ok. Let’s create the bassline.
Create a new pattern to the Playlist and open the Piano Roll -view of TS404 and create a following hypnotic, arpeggio style bassline:

This is how the bassline sounds:
Next, sidechain compress the kickdrum to the TS404 Bassline Synthesizer to make the bassline sit more nicely with the kickdrum. In order to do this, activate the kickdrum Mixer Track by clicking it and right click on that little up arrow -icon on the Bassline Mixer Track (TS404) and choose ‘Sidechain to this track’. Go to the Bassline Mixer Track and drop a Fruity Limiter to it’s fx slot and set it as follows (I’m using low Ratio (1.2:1) so that the sidechain compression effect is not too ‘pumpy’ as I want the bassline to have that psy-trance type of hypnotic ‘drive’ more than that modern trance-like pumping sound):

And this is how the bassline sounds together with the beat:
Beat and bassline is now ready but we are not done yet.
Add another instance of TS404 and assign it to a free Mixer Track. We are going to use it for creating a 303-ish type of sequence to support the bassline and to make the overall sound a bit more ‘psy’.
So, tweak the TS404 as follows:

Now, go the Mixer view and drop the volume level of this ‘303ish’ TS404 to -11.0dB (56%).
Next, eq the sound a bit. Using the Mixer Track eq, cut the low end off by using low shelf filter, setting the frequency to 222Hz, bandwidth to 0.40 and dropping the band level to -18.0dB. Boost the mid frequencies slightly by raising the peaking filter band level to 2.1dB (1500Hz). Also, roll off the high frequencies a bit by using the high shelf filter with these settings: frequency 8000Hz, bandwidth 0.27, bandwidth level -8.0dB.
Drop a Fruity Flanger to the TS404 Mixer Track fx slot, select a preset ‘Ultra Thin’ and tweak the rate to 0.789971. Also, adjust the mix level of the Fruity Flanger fx slot to 27%.
Drop a Fruity Delay 2 -effect to the fx slot and tweak it as shown in the pic below (also set the Fruity Delay 2 fx slot mixer level to 46%):

Okay. Next, head to Playlist and open the Bassline pattern Piano Roll -view by double clicking the pattern and copy the bassline sequence by selecting all the notes and pressing CTRL + C.
Go back to the Playlist, create a new pattern (press F4), double click on it and via the Step Sequencer go to the 303ish -channel Piano Roll -view and paste the bassline sequence here by pressing CTRL + V. Select all the notes and transpose them to one octave higher by holding down CTRL and pressing up arrow.
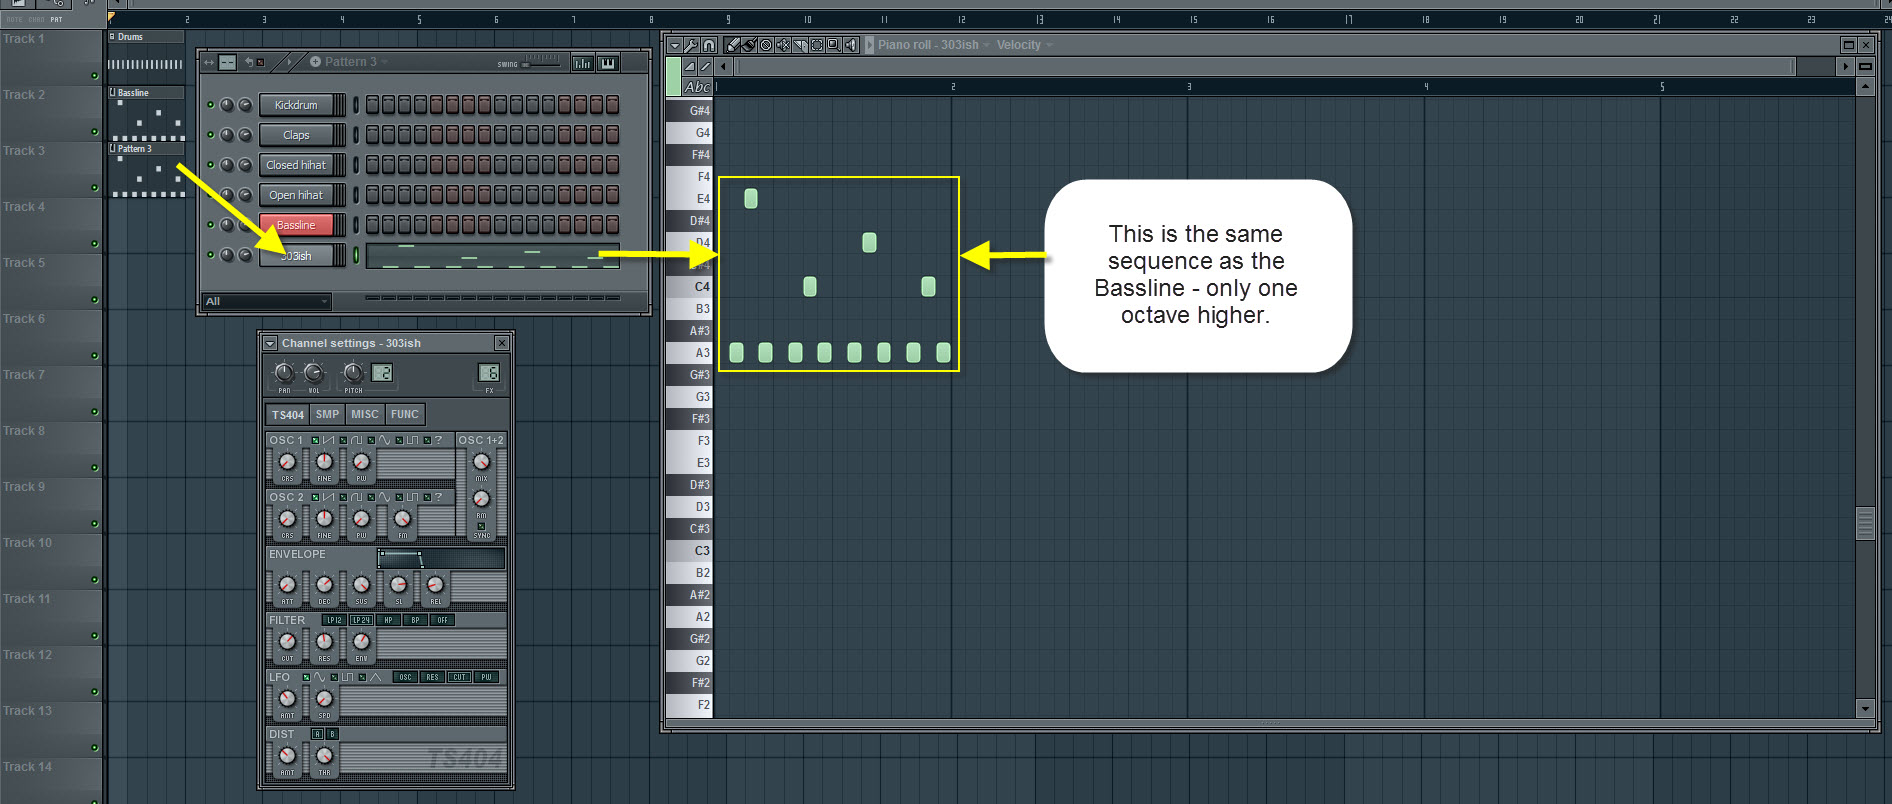
This is how the 303ish sequence sounds:
Alright. Next we’ll add a little variation to the drum groove.
Copy/paste the drum patterns and make two of the patterns unique via the Make Unique -function (right click on the pattern and choose Make Unique) and program a little variation to the drum sequence:

And we are done! Check the end results:
Check the video tutorial below and lastly, download the FL Studio project file:
(The kick drum I’m using in this project is from the G-Sonique PsytranceDrumKit1 Examples which I’m not allowed to share, but you can download the package for free from here and then you’re able to open my project file with no missing samples).


32 Comments
great stuff, you should make tutorial like this for progressive/bigroom house 🙂
Great tutorial Petri!!!!!!
Seriously love the feel of this beat!
Looks like I’m going back to a little trance 😀
Thanks alot!
Thanks Jon! 8)
hey there petri like others I am learning a lot from you and like to say thanks for all the hard work..Can you do a tutorial on a synth intro please or a build up melody in a psytrance…Would be really apprediacted..Take care and stay safe.
Nice tutorial, thanks.
Can you explain where to introduce leads with automation, and the other strings of trance?
thanks
Awesome tut as usual =D Great job
Hey Petri! how are ya? thanks for this tutorial another one that has caught my attention and will be playing around with this weekend, always learning cool stuff from you, thanks for sharing your knowledge with us.
Hey Charlee, I’m all good here – preparing a new tutorial (EQ related) and it should be ready in a 1-3 days 🙂 Glad you’re enjoying the tuts!
Hey man,
Awesome tutorial. Is it ok if i use the bass for a song ? i have some decent ideas coming up while messing about with your project file.
I’m an amateur so its not for profit 😛
Thanks for this btw !
Hey there Bilal, you can freely use the bass in your projects! 🙂
Awesome Tut
thanks for sharing sounds kinda cheezy imho.
Hey,I only have Hihat! How to find closed hihat and open hihat?:-)
Hi,
Did you download the G-Sonique Psytrance kit? Theres bunch of closed hihats included 8)
hi,
I just tried this out, sounds a bit different because i still dont get some of the finer stuff, but sounded great.
I tried something extra, thought i would share it,
Add a free filter to the 303ish sound and create an automation clip for the frequency, (Freq) and use it to creat a fade in effect, that is, the frequency goes from low to high. Pan it left to right also gives another cool feeling to the sound.
hi petri! nice tutorial, and i always visit your website….
by the way, do you know where i can get the basic of psytrance?
thanks.
Nice Tutorial, dude thanks alot!
Eventually u could do some tut’s ’bout progressive goa? :]
i just want to say thank so so much for all your tutorials. couple of weeks ago i had no idea about fl studio and now i know 75% about about fl studio. im gonna keep watching your videos till 100% haha
thank you again, lots of love from australia <3
fl studio 4 life
hi petri i want to know how can i make a rock or metal music in fl studio?is fl slayer useful for this?
takes some patience to catch on but very very helpful. thank you 🙂
Hey, Really Good Tutorial. thanks a lot 🙂
Wow, what a awesome site!!! , I’m so happy that you make all these helpful tuts. thanx alot !!! 🙂
yeah, now every idiot can make psytrance too!
Amazing work.
lessonsfromdaguru! kiitti petri! näist on ollu paljon apua!
Hienoa! Kiitokset!
Excellent job!!! Very well xplained. Thanks!
Aaah, this tutorial is awesome, thanks so much man, really helped me lay the foundations for a really good psy tune.
Thanks really helping good tutorial God bless:)
Nice Tutorial, nice! 😀
well this help a lot was making PSY trance in 160 BPM but now back on the track
Thanks a Lot Prtri Suhonen
sick, mahalo!